Have you ever gone to flush your toilet, only for the handle to stay down? This is an annoying problem that can cause a lot of frustration. But don’t worry – it’s something that can easily be fixed and doesn’t require any special tools or expertise. In this article, we’ll show you how to fix a toilet handle that stays down in three simple steps.
If you’re dealing with a stuck handle on your toilet, then you’re probably feeling a bit overwhelmed. It makes sense; plumbing problems often seem daunting at first glance. Rest assured though – once you learn the basics of fixing a stuck handle, it won’t feel so intimidating anymore! We’ll help guide you through the process so that all you have left to do is get started.
So if your toilet handle has been giving you trouble lately, why not try tackling the problem yourself? You could save yourself time, money, and hassle by following our instructions below. With just a few easy tweaks here and there, we’re confident that your toilet will soon be working like new again!
Overview Of Problem
Having a toilet handle that stays down can be so frustrating. It’s an issue many of us have encountered at some point, and it’s important to fix it right away. The first step is to identify the problem: Is the lift arm not springing back up after flushing? Or is it bent or crooked in such a way that it won’t straighten out? If your answer is yes, then you need to look into fixing the handle.
In most cases, the solution is fairly straightforward and doesn’t require any special tools. All you need to do is take off the lid from the top of your toilet tank and adjust or replace the components inside. This will help restore normal functioning by allowing the lift arm to return fully upright when flushed. With this knowledge, we’re now ready for safety considerations before attempting repairs on our own.
Safety Considerations
Safety should always be top-of-mind when attempting to fix any plumbing issue. Fixing a toilet handle that stays down requires special attention in order for the job to go smoothly and without causing further damage. Take a deep breath, gather your tools, and let’s get started – but not before considering the potential hazards of this repair:
- Be aware of the water supply line connected to the ballcock valve;
- Wear eye protection while working with small parts;
- Have appropriate cleaning supplies on hand to clean up after you finish;
- Make sure all shutoff valves are turned off before beginning work.
Taking these safety considerations into account will help ensure that your project is completed successfully and safely. Now it’s time to get our hands dirty by gathering the necessary materials and tools so we can begin tackling this task!
Gathering Necessary Tools And Materials
Before beginning any repairs, it’s important to gather the necessary tools and materials. This includes a loop connector and adjustable wrench that will fit your toilet handle.
| Tool | Use |
|---|---|
| Loop Connector | To reattach lift chain to flush lever arm. |
| Adjustable Wrench | To unscrew old parts from tank of toilet. |
Once you have gathered the essential items, you are ready for the next step in fixing your toilet handle: shutting off the water supply. Now that all the necessary materials have been collected, you can start making progress towards repairing your malfunctioning toilet handle.
Shutting Off Water Supply
The first step in fixing a toilet handle that stays down is to shut off the water supply. This can be done with a twist of fate, metaphorically speaking. To get started, locate the main shut-off valve for your home’s water supply. It’ll usually be found near where the water line enters your house or building. Turn it clockwise until it stops – this will prevent any more water from entering the tank and leaving you with an overflowing mess!
Next, find the shut-off valve located inside the bathroom itself. Usually, that’ll be behind or beside the toilet on its own dedicated pipe. Again, turn it clockwise until it stops – now no water should flow into the tank at all! This is important because without shutting these valves off before working on a toilet handle, you run the risk of being drenched by surprise if something goes wrong during repairs.
With both valves safely closed, we’re ready to move on to removing the old toilet handle and replacing it with a new one.
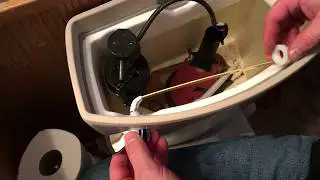
Removing The Toilet Handle
Now that the water supply has been shut off, it is time to remove the toilet handle. To do this effectively and safely:
- Put on a pair of gloves for protection.
- Unscrew the cap from the top of the handle using an adjustable wrench or screwdriver.
- Take out any screws holding the handle in place and gently lift it away from the wall so you can access its internal mechanisms.
- Disconnect any wires connected to the back of the handle before removing it completely from the wall.
Once all these steps are complete, you should now have access to identifying what exactly is causing your toilet handle to stay down – whether it be a faulty flapper valve, broken chain, loose lever arm, etc. Then based on your findings, you will know how best to proceed with fixing your issue!
Identifying The Problem
Figuring out the issue is half of the battle when it comes to fixing a toilet handle that stays down. To begin, one should first inspect the area surrounding the handle for any signs of damage or wear and tear. Taking a look inside the tank can also be helpful in pinpointing what needs to be done next.
Next up is investigating how exactly the parts are connected and if something appears to be off about its positioning. This can involve examining where the lift chain attaches to the flapper valve at one end and how it connects to the lever arm on the other side. If either part appears loose or broken, then this could explain why your handle won’t stay up after being pressed down.
Finally, make sure there’s no debris obstructing any of these components or preventing them from working properly – dirt buildup resulting from water deposits can cause issues like this as well. It’s time now to move on to cleaning and lubricating parts so they’ll function optimally again.
Cleaning And Lubricating Parts
The first step in fixing a toilet handle that stays down is to clean and lubricate the parts. This can be done by removing the top of the tank, cleaning off any dirt or grime from around the lift arm, flush the valve assembly, and other moving parts. A cloth dampened with warm soapy water works well for this purpose.
Once all of these parts are clean, it’s time to lubricate them. Use a small amount of mineral oil on each part before reassembling everything back together. Make sure not to over-lubricate as this could cause more problems than it solves. Ensure that all pieces fit snugly against one another when you’re done.
Now your toilet has been cleaned and lubricated properly. The next step is replacing any damaged parts if necessary.
Replacing Damaged Parts
Now that all the parts have been cleaned and lubricated, it’s time to replace any broken ones. Depending on the severity of the damage, this process may involve removing screws or bolts with a screwdriver or wrench. To make sure you get the job done properly, here is a handy three-column table for guidance:
| Part | Tool | Step |
|---|---|---|
| Handle & Locknut | Screwdriver/Wrench | Remove screws/bolts from the handle and locknut assembly. |
| Flush Valve Gasket | Pliers/Screwdriver | Loosen the gasket using pliers or a screwdriver. Replace if necessary. |
| Trip Lever Linkage Assembly Bracket & Nut Plate | Wrench/Pliers | Unscrew the nut plate and bracket from the trip lever linkage assembly. Tighten if needed. |
Once all the damaged pieces are removed, it’s time to start reattaching everything back together in the reverse order they were taken apart in; starting with replacing the trip lever linkage assembly bracket and nut plate before continuing onto flushing the valve gasket and then finally handle & locknut assembly. With each part securely fastened into place, your toilet should now be good as new!
Reattaching The Handle
According to the American Water Works Association, approximately 32.5 gallons of water are flushed down toilets in the United States each day! With that much use, it’s important to make sure your toilet handle isn’t stuck down and easy to flush properly. Luckily, reattaching a toilet handle is an easy fix.
First, you will need some common tools such as screwdrivers, needle-nose pliers, and adjustable wrenches. Then turn off the water supply to the toilet by turning off the valve clockwise until it stops moving. Once done, remove the cap from around the handle using a flathead screwdriver or other tool. There should be two screws holding on either side of the lever plate; loosen them with a Philips head screwdriver and pull out the plate along with its attached rod.
The next step is to unscrew and take apart the nut connecting the rod assembly inside of where you just removed it from earlier. Remove any rust or buildup before replacing all components back into place securely and tightly – no parts should be loose at this point. Tighten all screws in order for everything to stay put when finished. Without saying ‘In conclusion’ or ‘Finally’, this marks the end of how to reattach your toilet handle so that it doesn’t remain stuck down after flushing – now onto adjusting chain length!
Adjusting The Chain Length
Now that the handle is reattached, it’s time to adjust the chain length. This will help ensure the toilet flushes properly when you pull up on the handle. Here are a few steps to follow:
- Inspect the chain and make sure there aren’t any kinks or tangles.
- Locate the arm connecting the flush lever to the flapper valve at the bottom of the tank.
- Adjust and shorten or lengthen this chain so that it has some tension but doesn’t tug too hard on either side – if it pulls too tight, your toilet won’t be able to flush; if it’s too loose, it can cause water waste and extra noise from inside your tank as well.
Once you’ve finished adjusting your chain length, test out your adjustment by pulling up the handle and verifying that your toilet flushes correctly without any leaks or issues. If everything looks good, move on to sealing around your tank lid to prevent further leaks in future use!
Sealing To Prevent Further Leaks
Once the handle is fixed, it’s important to make sure that no more leaks occur from the toilet. Sealing any cracks or holes helps ensure this.
| Crack/Hole | Materials Needed |
|---|---|
| Toilet Base | Caulk Gun and Tube of Caulk |
| Around Tank Bolts | Plumber’s Putty |
| Under Rim of Bowl | Silicone Sealant and Sponge for Cleaning Up Excess Sealant |
To begin, use a caulk gun to apply a bead of caulk around the base of the tank where it meets with the floor. Then, wrap the plumber’s putty around each bolt on your tank before tightening them down firmly. Finally, run a thin line of silicone sealant underneath the rim of the bowl. Wipe up any excess sealant using a damp sponge in order to prevent discoloration.
These steps will help keep your toilet watertight so you can enjoy its convenience without worrying about further leakage issues. With proper sealing complete, you are now ready to move on to final thoughts on maintenance and upkeep for your newly-repaired toilet handle.
Final Thoughts
Transitioning from the previous section, there are many ways to fix a toilet handle that stays down. According to one survey, about 42% of homeowners have experienced this issue at least once in their lifetime. To ensure that the problem is fixed properly and safely, it’s important to understand how these mechanisms work before attempting any repairs.
First, identify what type of handle your toilet has: either a side mount or a trip lever mount located on top of the tank lid. If you’re not sure which type you have, take off the tank lid and check inside for clues. Once the mechanism is identified, turn off the water supply valves located near the base of the toilet—this will prevent water flooding during the repair. Afterward, remove screws holding the handle in place with a screwdriver and lift out old parts such as linkage rods and washers; replace them with new ones after cleaning all components with mild soap and warm water. Finally, reassemble everything back together tightly until secure and restore power by turning on the shutoff valves again.
If done correctly, your toilet should now be working perfectly fine! Always remember to keep up regular maintenance checks so you can catch small issues early before they become bigger problems later on. Keep an eye out for signs like changes in flushing force, rusting hardware pieces or leaking seals – all indicators that further attention may be needed soon.
Conclusion
In conclusion, it turns out that fixing a toilet handle is actually quite simple. Although this might seem like an intimidating task for the typical person to tackle when facing plumbing issues, all you need is the right tools and materials along with a little bit of know-how.
When I initially encountered my own issue with my toilet handle, I thought I was in over my head. After doing some research, however, I found that these types of repairs can be done fairly quickly and easily – something that was ironic considering how much effort I put into trying to fix it on my own!
It’s always worth taking the time to do your own home maintenance whenever possible; not only does it save money but it gives me great satisfaction knowing that I’m able to take care of any problems without having to call in help from professionals. So next time your toilet handle starts acting up, don’t forget what you’ve learned here today and give it a try yourself!